졸업을 했고 또 입학을 하고 또 GPU 세팅을 하게 된 나...ㅎ
이번엔 내 로컬 PC다!!!
렙업을 해서 이제 로컬 PC에 GPU를 달 수 있게 됨 (물론 일도 엄청 해야 함)
내가 해야할 일은
Ubuntu 22.04에
NVIDIA GeForece RTX 4090 GPU를 세팅하고
Docker도 세팅하고
Alphafold도 세팅하고 테스트까지 마치는 게 목표임
시작!
먼저 (당연히 알고 있지만)
내 PC의 OS 확인
$ cat /etc/*release


DISTRIB_ID=Ubuntu
DISTRIB_RELEASE=22.04
DISTRIB_CODENAME=jammy
DISTRIB_DESCRIPTION="Ubuntu 22.04.3 LTS"
PRETTY_NAME="Ubuntu 22.04.3 LTS"
NAME="Ubuntu"
VERSION_ID="22.04"
VERSION="22.04.3 LTS (Jammy Jellyfish)"
VERSION_CODENAME=jammy
ID=ubuntu
ID_LIKE=debian
HOME_URL="https://www.ubuntu.com/"
SUPPORT_URL="https://help.ubuntu.com/"
BUG_REPORT_URL="https://bugs.launchpad.net/ubuntu/"
PRIVACY_POLICY_URL="https://www.ubuntu.com/legal/terms-and-policies/privacy-policy"
UBUNTU_CODENAME=jammy
설치 전 준비(기존 설치 파일들 삭제)
사실 안해도 되는데 만약에 기존에 설치했다가 구동에 실패했다거나 하면 설치 파일들이 남아있을테니 그런 경우에는 아래 명령어로 지워준다.
$ sudo rm /etc/apt/sources.list.d/cuda*
$ sudo apt --purge autoremove nvidia*
$ sudo apt remove --autoremove nvidia-cuda-toolkit
이렇게 해도 안지워지면,
# Nvidia driver 완전 삭제
$ sudo apt-get autoremove
$ sudo apt-get autoclean

# CUDA 완전 삭제
$ sudo rm -rf /usr/local/cuda*
$ sudo apt-get --purge remove 'cuda*'
$ sudo apt-get autoremove --purge 'cuda*'

# 삭제 여부 확인
$ sudo dpkg -l | grep 확인대상

# 삭제
$ sudo apt-get remove --purge 삭제대상
Nvidia driver 설치
$ ubuntu-drivers devices

== /sys/devices/pci0000:00/0000:00:01.0/0000:01:00.0 ==
modalias : pci:v000010DEd00002684sv00001462sd00005103bc03sc00i00
vendor   : NVIDIA Corporation
driver   : nvidia-driver-535-server - distro non-free
driver   : nvidia-driver-535 - distro non-free recommended
driver   : nvidia-driver-535-open - distro non-free
driver   : nvidia-driver-525 - distro non-free
driver   : nvidia-driver-525-open - distro non-free
driver   : nvidia-driver-535-server-open - distro non-free
driver   : nvidia-driver-525-server - distro non-free
driver   : xserver-xorg-video-nouveau - distro free builtin
이렇게 하면 추천 드라이버가 나오긴 하는데 그냥...
$ sudo ubuntu-drivers autoinstall
autoinstall 하는게 편하다 ^^....
추천 드라이버는
https://www.nvidia.com/Download/index.aspx?lang=en-us
Download the latest official NVIDIA drivers
Download the latest official NVIDIA drivers
www.nvidia.com
여기서도 확인할 수 있음!
만약에 드라이버를 원하는 버전으로 수동 설치 하고 싶다면
$ sudo add-apt-repository ppa:graphics-drivers/ppa
$ sudo apt update
$ sudo apt install nvidia-driver-535
이런식으로 해주면 됨
그 다음 reboot!
$ sudo reboot
설치 후 확인
$ nvidia-smi

Wed Nov 22 16:41:47 2023
+---------------------------------------------------------------------------------------+
| NVIDIA-SMI 535.129.03             Driver Version: 535.129.03   CUDA Version: 12.2     |
|-----------------------------------------+----------------------+----------------------+
| GPU  Name                 Persistence-M | Bus-Id        Disp.A | Volatile Uncorr. ECC |
| Fan  Temp   Perf          Pwr:Usage/Cap |         Memory-Usage | GPU-Util  Compute M. |
|                                         |                      |               MIG M. |
|=========================================+======================+======================|
|   0  NVIDIA GeForce RTX 4090        Off | 00000000:01:00.0  On |                  Off |
|  0%   36C    P8              25W / 450W |    220MiB / 24564MiB |      5%      Default |
|                                         |                      |                  N/A |
+-----------------------------------------+----------------------+----------------------+

+---------------------------------------------------------------------------------------+
| Processes:                                                                            |
|  GPU   GI   CI        PID   Type   Process name                            GPU Memory |
|        ID   ID                                                             Usage      |
|=======================================================================================|
|    0   N/A  N/A      2121      G   /usr/lib/xorg/Xorg                           81MiB |
+---------------------------------------------------------------------------------------+
음.. 굿~
다음은,
CUDA 설치
https://docs.nvidia.com/deploy/cuda-compatibility/index.html
Nvidia driver에 맞는 cuda를 설치한다.

나는 드라이버 버전이 535.129.03니까... 12.3을 써야할 것 같지만?
실제 설치는 12.2로 했다
nvidia-smi 쳐보면 추천 버전이 CUDA 12.2길래.. 혼란스러웠지만... 일단 12.2로 가기로 함
참고로 nvidia-smi에 나오는 cuda버전은 실제 버전이 아니라 여기까지 설치가 가능하다는 것을 알려주는 것..
https://developer.nvidia.com/cuda-toolkit-archive
CUDA Toolkit Archive
Previous releases of the CUDA Toolkit, GPU Computing SDK, documentation and developer drivers can be found using the links below. Please select the release you want from the list below, and be sure to check www.nvidia.com/drivers for more recent production
developer.nvidia.com
그래서 위 사이트에서 내 환경에 맞게 골라서 설치해주면 되는데 나는 12.2 버전이 세개 있어서 그냥 중간걸로^^ 했다
12.2.1을 설치했다는 소리 ~
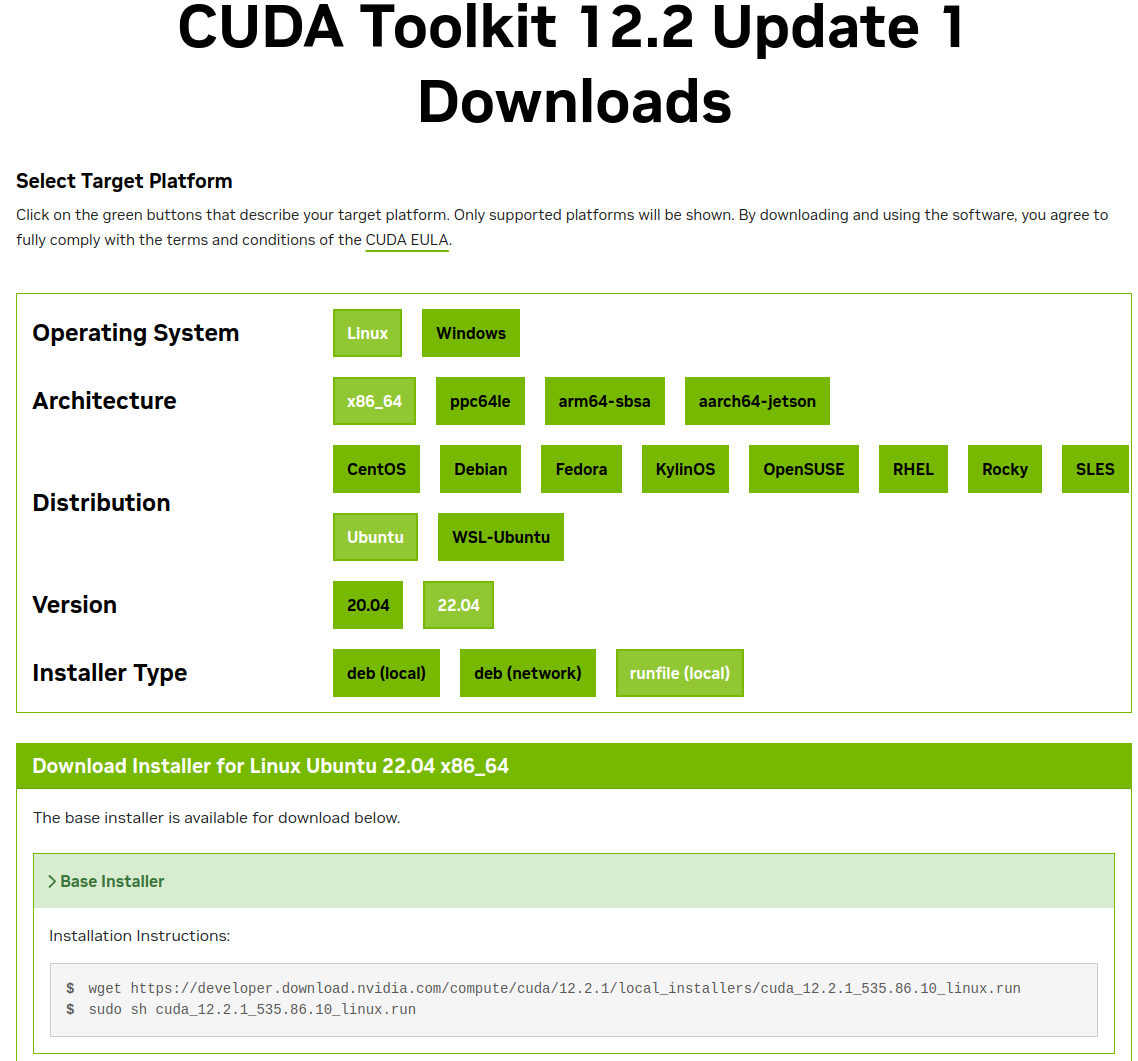
저번에는 deb로 설치했는데 이번엔 그냥 runfile로 설치했다
Installer type은 사실 뭘로 하든 상관없음...
$ wget https://developer.download.nvidia.com/compute/cuda/12.2.1/local_installers/cuda_12.2.1_535.86.10_linux.run
$ sudo sh cuda_12.2.1_535.86.10_linux.run


===========
= Summary =
===========

Driver:   Not Selected
Toolkit:  Installed in /usr/local/cuda-12.2/

Please make sure that
 -   PATH includes /usr/local/cuda-12.2/bin
 -   LD_LIBRARY_PATH includes /usr/local/cuda-12.2/lib64, or, add /usr/local/cuda-12.2/lib64 to /etc/ld.so.conf and run ldconfig as root

To uninstall the CUDA Toolkit, run cuda-uninstaller in /usr/local/cuda-12.2/bin
***WARNING: Incomplete installation! This installation did not install the CUDA Driver. A driver of version at least 535.00 is required for CUDA 12.2 functionality to work.
To install the driver using this installer, run the following command, replacing <CudaInstaller> with the name of this run file:
    sudo <CudaInstaller>.run --silent --driver

Logfile is /var/log/cuda-installer.log
똑같이 터미널에 입력해서 파일 다운로드 받고 실행시켜주면 된다.
근데
Failed to verify gcc version. See log at /var/log/cuda-installer.log for details.
이런 에러가 나서 뭐지 하고 gcc --version 으로 조회해봤더니
Command 'gcc' not found, but can be installed with:
sudo apt install gcc
ㅋ.... 머쓱
install 해준다. 이미 install 되어 있으면 에러 안남!
물론 cuda 버전과 gcc버전이 안맞으면 에러날 수도 있음.. 그럴 경우는
https://stackoverflow.com/questions/6622454/cuda-incompatible-with-my-gcc-version
CUDA incompatible with my gcc version
I have troubles compiling some of the examples shipped with CUDA SDK. I have installed the developers driver (version 270.41.19) and the CUDA toolkit, then finally the SDK (both the 4.0.17 version).
stackoverflow.com
이 글을 참고하셔서 gcc 버전을 맞춰주셔라~
아참!
설치 시에 화면이 뜨는데
1) continue 선택
2) accept 입력
3) CUDA installer 에서는 이미 Driver를 설치했으니 드라이버만 X를 해제해주고 설치하면 된다!
다음엔 path를 추가해줘야겠쥐
$ vi ~/.bashrc

# >>> cuda 12.2 >>>
export PATH=/usr/local/cuda-12.2/bin${PATH:+:${PATH}}
export LD_LIBRARY_PATH=/usr/local/cuda-12.2/lib64:${LD_LIBRARY_PATH:+:${LD_LIBRARY_PATH}}
# << cuda 12.2 <<

$ source ~/.bashrc
vi 가 편집이 제대로 안되서 짜증나서
gedit ~/.bashrc 로 열어서 편집함...ㅎ
아무튼 이렇게 추가를 해준 뒤에
$ nvcc -V

nvcc: NVIDIA (R) Cuda compiler driver
Copyright (c) 2005-2023 NVIDIA Corporation
Built on Tue_Jul_11_02:20:44_PDT_2023
Cuda compilation tools, release 12.2, V12.2.128
Build cuda_12.2.r12.2/compiler.33053471_0
이렇게 나오면 성공!
만약에 조회가 되지 않는다면 터미널을 재시작한 뒤 다시 확인해보자
CUDNN 설치
헉헉 마지막으로 CUDNN 설치...
https://developer.nvidia.com/rdp/cudnn-archive
cuDNN Archive
Download releases from the GPU-accelerated primitive library for deep neural networks.
developer.nvidia.com

나는 12.x고 ubuntu고.. Tar로 설치하고 싶어서 두번째꺼 다운받았당
이제 설치해야지
$ tar -xvf cudnn-linux-x86_64-8.9.6.50_cuda12-archive.tar.xz

$ sudo cp cudnn-linux-x86_64-8.9.6.50_cuda12-archive/include/cudnn*.h /usr/local/cuda/include
$ sudo cp cudnn-linux-x86_64-8.9.6.50_cuda12-archive/lib/libcudnn* /usr/local/cuda/lib64
$ sudo chmod a+r /usr/local/cuda/include/cudnn*.h /usr/local/cuda/lib64/libcudnn*
이렇게 설치해주고,
$ cat /usr/local/cuda/include/cudnn_version.h | grep CUDNN_MAJOR -A 2

#define CUDNN_MAJOR 8
#define CUDNN_MINOR 9
#define CUDNN_PATCHLEVEL 6
--
#define CUDNN_VERSION (CUDNN_MAJOR * 1000 + CUDNN_MINOR * 100 + CUDNN_PATCHLEVEL)

/* cannot use constexpr here since this is a C-only file */


$ ldconfig -N -v $(sed 's/:/ /' <<< $LD_LIBRARY_PATH) 2>/dev/null | grep libcudnn

	libcudnn_ops_infer.so.8 -> libcudnn_ops_infer.so.8.9.6
	libcudnn_ops_train.so.8 -> libcudnn_ops_train.so.8.9.6
	libcudnn_cnn_infer.so.8 -> libcudnn_cnn_infer.so.8.9.6
	libcudnn_adv_infer.so.8 -> libcudnn_adv_infer.so.8.9.6
	libcudnn_adv_train.so.8 -> libcudnn_adv_train.so.8.9.6
	libcudnn_cnn_train.so.8 -> libcudnn_cnn_train.so.8.9.6
	libcudnn.so.8 -> libcudnn.so.8.9.6
확인해보기! 아래처럼 출력되면 성공~~
Docker 설치
이제 Docker 설치를 해보자...........
https://docs.docker.com/engine/install/ubuntu/
Install Docker Engine on Ubuntu
Jumpstart your client-side server applications with Docker Engine on Ubuntu. This guide details prerequisites and multiple methods to install Docker Engine on Ubuntu.
docs.docker.com
$ sudo apt-get update

$ sudo apt-get install -y \
  apt-transport-https \
  ca-certificates \
  curl \
  gnupg-agent \
  software-properties-common

$ for pkg in docker.io docker-doc docker-compose podman-docker containerd runc; do sudo apt-get remove $pkg; done

$ sudo apt-get update

$ sudo install -m 0755 -d /etc/apt/keyrings
$ curl -fsSL https://download.docker.com/linux/ubuntu/gpg | sudo gpg --dearmor -o /etc/apt/keyrings/docker.gpg
$ sudo chmod a+r /etc/apt/keyrings/docker.gpg

$ echo \
  "deb [arch="$(dpkg --print-architecture)" signed-by=/etc/apt/keyrings/docker.gpg] https://download.docker.com/linux/ubuntu \
  "$(. /etc/os-release && echo "$VERSION_CODENAME")" stable" | \
  sudo tee /etc/apt/sources.list.d/docker.list > /dev/null

$ sudo apt-get install -y nvidia-docker2
이런 식으로 설치를 해주고 설치가 잘 됐는지 확인!
$ docker -v

Docker version 24.0.7, build afdd53b


$ sudo docker run hello-world


Unable to find image 'hello-world:latest' locally
latest: Pulling from library/hello-world
719385e32844: Pull complete
Digest: sha256:c79d06dfdfd3d3eb04cafd0dc2bacab0992ebc243e083cabe208bac4dd7759e0
Status: Downloaded newer image for hello-world:latest

Hello from Docker!
This message shows that your installation appears to be working correctly.

To generate this message, Docker took the following steps:
 1. The Docker client contacted the Docker daemon.
 2. The Docker daemon pulled the "hello-world" image from the Docker Hub.
    (amd64)
 3. The Docker daemon created a new container from that image which runs the
    executable that produces the output you are currently reading.
 4. The Docker daemon streamed that output to the Docker client, which sent it
    to your terminal.

To try something more ambitious, you can run an Ubuntu container with:
 $ docker run -it ubuntu bash

Share images, automate workflows, and more with a free Docker ID:
 https://hub.docker.com/

For more examples and ideas, visit:
 https://docs.docker.com/get-started/
잘 되었구나..
일어나... nvidia-container-toolkit 깔아야지....
Installing the NVIDIA Container Toolkit — NVIDIA Container Toolkit 1.14.3 documentation
© Copyright 2020-2023, NVIDIA. Last updated on Oct 20, 2023.
docs.nvidia.com
$ curl -fsSL https://nvidia.github.io/libnvidia-container/gpgkey | sudo gpg --dearmor -o /usr/share/keyrings/nvidia-container-toolkit-keyring.gpg \
  && curl -s -L https://nvidia.github.io/libnvidia-container/stable/deb/nvidia-container-toolkit.list | \
    sed 's#deb https://#deb [signed-by=/usr/share/keyrings/nvidia-container-toolkit-keyring.gpg] https://#g' | \
    sudo tee /etc/apt/sources.list.d/nvidia-container-toolkit.list \
  && \
    sudo apt-get update


$ sudo apt-get install -y nvidia-container-toolkit
이렇게 설치해주고,
$ sudo systemctl restart docker

$ sudo docker run --rm --runtime=nvidia --gpus all nvidia/cuda:11.8.0-base-ubuntu20.04 nvidia-smi

Unable to find image 'nvidia/cuda:11.8.0-base-ubuntu20.04' locally
11.8.0-base-ubuntu20.04: Pulling from nvidia/cuda
96d54c3075c9: Pull complete
09d415c238d7: Pull complete
9fe6e2e61518: Pull complete
41f16248e682: Pull complete
95d7b7817039: Pull complete
Digest: sha256:8803790082168d6fc95089288e8debb8e8318386658d10deb5c7175ec83b5e14
Status: Downloaded newer image for nvidia/cuda:11.8.0-base-ubuntu20.04
Wed Nov 22 08:55:45 2023
+---------------------------------------------------------------------------------------+
| NVIDIA-SMI 535.129.03             Driver Version: 535.129.03   CUDA Version: 12.2     |
|-----------------------------------------+----------------------+----------------------+
| GPU  Name                 Persistence-M | Bus-Id        Disp.A | Volatile Uncorr. ECC |
| Fan  Temp   Perf          Pwr:Usage/Cap |         Memory-Usage | GPU-Util  Compute M. |
|                                         |                      |               MIG M. |
|=========================================+======================+======================|
|   0  NVIDIA GeForce RTX 4090        Off | 00000000:01:00.0  On |                  Off |
|  0%   41C    P8              28W / 450W |    130MiB / 24564MiB |      4%      Default |
|                                         |                      |                  N/A |
+-----------------------------------------+----------------------+----------------------+

+---------------------------------------------------------------------------------------+
| Processes:                                                                            |
|  GPU   GI   CI        PID   Type   Process name                            GPU Memory |
|        ID   ID                                                             Usage      |
|=======================================================================================|
+---------------------------------------------------------------------------------------+
여기까지는 됐는데 docker ps 하니까
permission denied while trying to connect to the Docker daemon socket at unix:///var/run/docker.sock: Get "http://%2Fvar%2Frun%2Fdocker.sock/v1.24/containers/json": dial unix /var/run/docker.sock: connect: permission denied
이런 에러가 발생해서
$ sudo usermod -a -G docker $USER

$ sudo reboot

$ docker ps

CONTAINER ID   IMAGE     COMMAND   CREATED   STATUS    PORTS     NAMES
docker 그룹에 사용자 추가하고 재부팅하고 다시 docker ps 해보면 성공~!!
Alphafold
https://github.com/google-deepmind/alphafold
GitHub - google-deepmind/alphafold: Open source code for AlphaFold.
Open source code for AlphaFold. Contribute to google-deepmind/alphafold development by creating an account on GitHub.
github.com
알파폴드는 별건 없는데
Dockerfile을 좀 수정해줘야한다.
대단한 건 아니고 베이스 이미지를 바꿔줘야 함...
# ARG CUDA=11.1.1
# FROM nvidia/cuda:${CUDA}-cudnn8-runtime-ubuntu18.04

ARG CUDA=11.8.0
FROM nvidia/cuda:11.8.0-cudnn8-devel-ubuntu20.04
주석처리한게 기존 파일이고 아래가 수정한 파일이다
이렇게 해서 이미지를 생성해주면 된다.
그리고 테스트를 해봐야하는데... 대충 짧은 서열의 fasta 파일로 테스트해주면 됨
Alphafold는 사실 해당 github readme에 설명이 잘 나와있고, 트러블슈팅은 issue에서 검색해가면서 하면 된당
Dockerfile 말고는 딱히 문제는 없었던듯?
문제가 생길만한 부분은 run_docker.py에 main 함수에 각 디렉토리에 해당 파일들이 잘 위치해있는지 이름은 다르지 않은지 확인을 해야하는 정도?
그리고 cpu 여력이 된다면 alphafold/alphafold/data/tools에서
hhblits.py와 jackhmmer.py에서 n_cpu 숫자를 조금 올려주면 더 빠르게 테스트가 가능하다
나는 코어수가 많아서 10, 15 이렇게 설정해두고 돌렸더니 10분? 20분? 정도 걸린 듯..
서열은 샘플로 생성한 아래 서열을 사용했다
>seq0
FQTWEEFSRAAEKLYLADPMKVRVVLKYRHVDGNLCIKVTDDLVCLVYRTDQAQDVKKIEKF
테스트에 성공하면 해당 fasta 파일의 이름으로 폴더가 생성되고, 안에는

이런 식의 파일들이 들어있다. 이렇게 된다면 테스트 성공!!!
'OS > Linux' 카테고리의 다른 글
| Amazon Linux 2023에 Selenium과 Chrome설치 (0) | 2025.03.10 |
|---|---|
| tmux로 세션 유지하며 백그라운드에서 shell script 실행 (0) | 2023.08.08 |
| 현재 디렉토리의 하위 디렉토리, 파일 갯수 (0) | 2023.08.08 |
| gdc-client centos7 (0) | 2023.08.08 |
| 리눅스 메모리 캐시 지우기 (0) | 2023.07.23 |